Kotlin Native and Raspberry Pi pt.1: build script
Kotlin is not only a JVM programming language. JetBrains also actively develops official Kotlin compilers that target JavaScript and native executables. Today we’re going to take a deep dive at the latter. Over the course of three articles, we will build a Kotlin Native application for Raspberry Pi that uses a small, monochrome SSD1306 OLED display for showing images and text messages. In the first part, we will learn how to write Gradle build scripts for Kotlin Native and link our project with C libraries. Sounds interesting? Then let’s go!
tl;dr;
Kotlin Native allows building native executables from Kotlin sources, using the familiar Gradle build system. It supports different hardware architectures (including ARM). We can also generate bindings for C libraries using cinterop tool.
What you will learn
In the first part, we will take a look at:
- hardware setup for our project: Raspberry Pi, GPIO and SPI protocol
- creating a build script for Kotlin Native and Raspberry Pi
- generating Kotlin bindings for C libraries
- using C libraries in Kotlin Native applications
In the next parts, we will learn about:
- using bcm2385 library and SPI protocol in Raspberry Pi
- programming displays based on SSD1306 chipset
- using Ktor Client in Kotlin Native for fetching data over HTTP
Hardware setup
This time, our project requires a bit of extra hardware. We are going to use a popular microcomputer, Raspberry Pi with an extra peripheral display based on SSD1306 chipset. You can find the complete list of equipment below:
- Raspberry Pi 4 Model B – from $35.00 for version with 1 GB RAM
- Waveshare 0.96inch OLED (B) display with SSD1306 chipset – from $7.99
- Some colling for the CPU
- Power supply for Raspberry Pi 4
- A set of GPIO connector cables
If you have Raspberry Pi 3, it will also work. In fact, I built everything on a spare Raspberry Pi 3 from my previous project. You can buy all pieces independently or find one of many Starter Kits. For example, in EU countries, you can order a Prototype Set by justPi that contains both the display and the necessary connector cables (and many more).
Beware of overheating
Electronic devices produce heat while working, and Raspberry Pi is no exception. For Raspberry Pi 3 and an open case, a passive radiator is usually sufficient. However, Raspberry Pi 4 has a more powerful CPU. You might consider using an active cooling for it.
Connecting SSD1306 display and Raspberry Pi
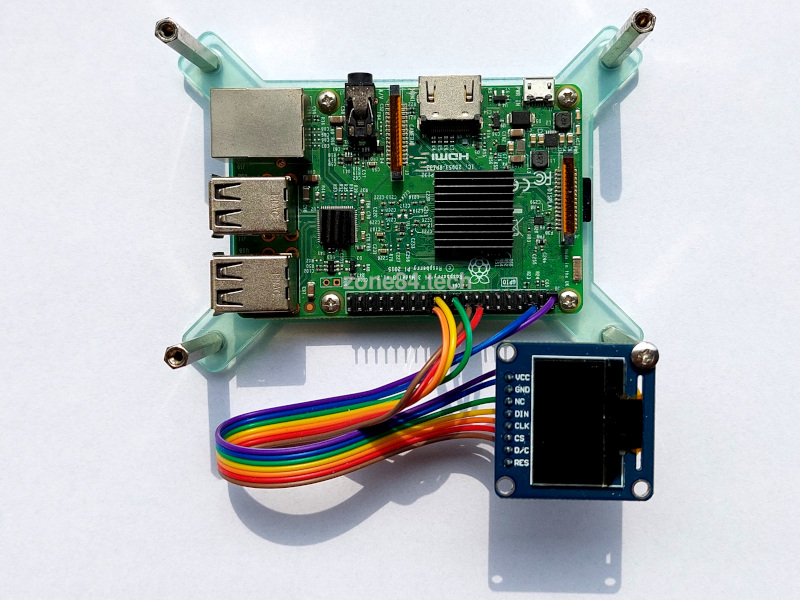
In the picture above, you can see my setup. Raspberry Pi is a tiny board comprising a powerful, 4-core ARM CPU, 1 GB RAM (up to 4 GB in Raspberry Pi 4), Ethernet, HDMI and USB ports. I mounted it on a simple plexiglass case for stability. The operating system is a Linux distribution called Raspberry PI OS, installed on a 16 GB SD card. In the middle of the image, we can see 40 GPIO pins. GPIO stands for “General-Purpose Input/Output”. Those pins allow connecting and programming various electronic devices. We need 7 pins to connect the display.
GPIO pins
The choice of GPIO pins matters in Raspberry Pi. Many pins have special functions, therefore we need to get familiar with them. Below, you can find a complete pin layout for Raspberry Pi 3 and 4:
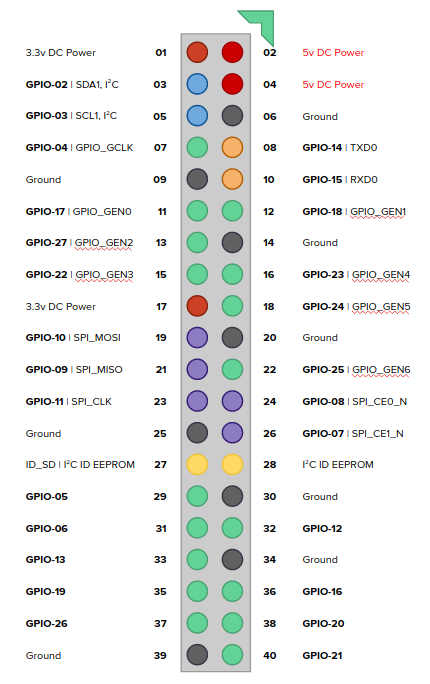
The chevron shows the corner of the board for orientation
We can identify every pin through its global number, or through the ID, such as GPIO-05. The latter is the one used by C libraries. Moreover, several pins have alternative functions. For example, if we activate SPI protocol, it takes over all purple pins. However, beware of pins 02 and 04 which provide 5V DC power. Raspberry Pi CPU operates on max. 3.3V. Therefore, if you accidentally connect pins 02 or 04 with other pins, you can fry your device. The best way is to protect them with a jumper, unless you need them.
Connection diagram
Waveshare SSD1306 display uses 4-wire SPI protocol (or I2C if we solder the jumpers) for communication. Below, we can see the cable layout:

But what is SPI, actually?
Standard GPIO pins give us total control on the produced signal (high or low). This is usually sufficient for controlling simple, electronic devices such as diodes or motors. However, things get complicated when we want to transmit binary data, send commands, etc. A couple of standards emerged many years ago to solve this issue. One is I2C, better standarized but also more complex. The other one is SPI, simpler yet more chaotic. It is a full-duplex, serial protocol that allows controlling a couple of devices through shared data lines. In our setup, we are using 3 SPI pins:
- SPI_MOSI (pin 19): for sending data to the display
- SPI_CLK (pin 23): clock for SSD1306 chipset
- SPI_CE0_N (pin 24): device selector
The display is not going to send us back any data, so we don’t need pin 21. We are also using GPIO23 and GPIO24 (pins 16 and 18 respectively) for specific functions of SSD1306 display. GPIO23 is connected to D/C input which allows switching between data and command transfer mode, and GPIO24 sends the “reset” signal.
Kotlin Native and Raspberry Pi
After this lengthy (but necessary) introduction to the hardware, we’re now ready to create a Kotlin Native project. The good thing is that we don’t need any exotic tools. Kotlin Native uses Gradle as a build system, which automatically downloads the LLVM compiler under the hood.
Mind the device!
Our particular application will target ARM architecture. This means that we won’t be able to run it on a regular PC. To test anything, you must always build an executable and copy it to Raspberry Pi!
Build script for Kotlin Native and Raspberry Pi
We can easily create a Kotlin Native project in IntelliJ IDEA:
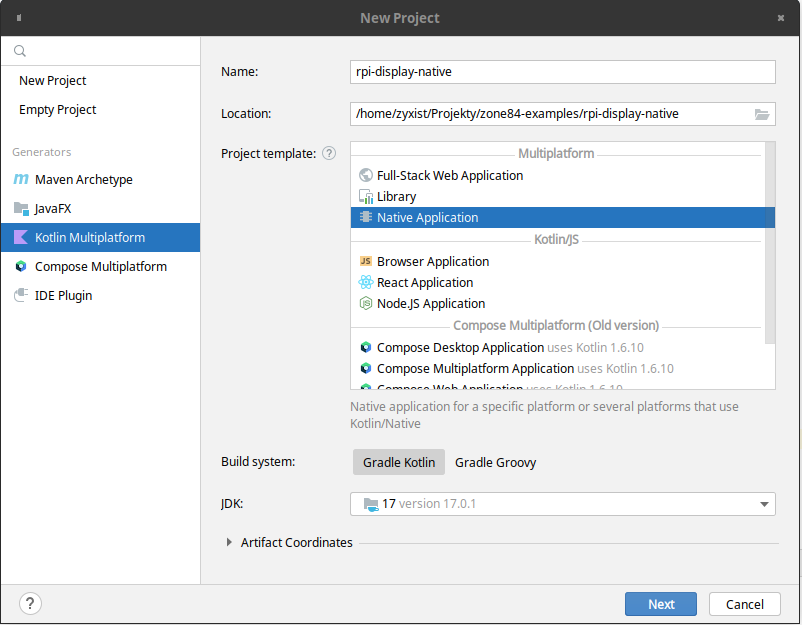
The creator will produce a default build.gradle.kts script that we need to adjust for our needs. Let’s remove the default platform selectors and replace it with just a single target: linuxArm32Hfp that will use “native” source set.
plugins {
    kotlin("multiplatform") version "1.7.10"
}

group = "tech.zone84.examples"
version = "1.0-SNAPSHOT"

repositories {
    mavenCentral()
}

kotlin {
    linuxArm32Hfp("native") {
        binaries {
            executable {
                entryPoint = "main"
            }
        }
    }
    sourceSets {
        val nativeMain by getting
        val nativeTest by getting
    }
}
To build and execute the program, we use Gradle and then send everything over SSH to Raspberry Pi:
$ ./gradlew linkReleaseExecutableNative
$ scp build/bin/native/releaseExecutable/rpi-display-native-demo.kexe myuser@myraspberrypi:/home/myuser/
$ ssh myuser@myraspberrypi
> ./rpi-display-native-demo.kexe
Binding C libraries
When writing native applications (especially for the IoT projects!) we often need to use libraries written in C language. In later articles, we are going to use bcm2835 library to talk through SPI and GPIO to our display. There is no Kotlin port of it, so we must create the necessary bindings our our own. This task is surprisingly easy with Kotlin Native, because we have a tool for that: cinterop. It scans C header files and produces the binding definitions understood by Kotlin compiler. As a result, we can use C functions directly in Kotlin.
By default, cinterop looks for libraries on our host machine. But in our case, we must link our application with the library for Raspberry Pi. This is not a problem, we just need to know what to do:
- find libbcm2835.a and bcm2835.h files on your Raspberry Pi
- copy them to your dev machine
- place them in
/src/nativeInterop/cinteropdirectory of your project
The next step is creating a definition file /src/nativeInterop/cinterop/bcm2835.def that controls the binding generation:
headers=bcm2835.h
package=bcm2835
staticLibraries=libbcm2835.a
libraryPaths=src/nativeInterop/cinterop
Finally, we need to modify build.gradle.kts:
kotlin {
    linuxArm32Hfp("native") {
        compilations {
            "main" {
                cinterops {
                    val bcm2835 by cinterops.creating {
                        defFile("src/nativeInterop/cinterop/bcm2835.def")
                        includeDirs("src/nativeInterop/cinterop/")
                    }
                }
            }
        }
        binaries {
            // ...
        }
    }
    // ...
}
Now try to refresh Gradle project in IntelliJ IDEA, and then open Main.kt file. Try to use bcm2835_init() function. You should notice that Kotlin recognizes it! Great!
In short…
Kotlin Native produces bindings for C libraries automatically – we just need to provide a small definition file to the compiler.
Workarounds for C bindings
The cinterop tool in Kotlin maps C structures to Kotlin types in an opinionated way. Sometimes the result is not what we want. This is exactly what happens with one of the functions in bcm2835 library. In the later articles, we will use bcm2835_spi_writenb() function to send data to the display. Its C signature looks like this:
/*! Transfers any number of bytes to the currently selected SPI slave.
  Asserts the currently selected CS pins (as previously set by bcm2835_spi_chipSelect)
  during the transfer.
  \param[in] buf Buffer of bytes to send.
  \param[in] len Number of bytes in the buf buffer, and the number of bytes to send
 */
extern void bcm2835_spi_writenb(const char* buf, uint32_t len);
It uses char* to represent a pointer to a byte buffer to transfer. But char* is also used for strings in C libraries. Unfortunately, this is how Kotlin understands it. In effect, we get bcm2835_spi_writenb(buf: String?, len: UInt) in Kotlin. If we convert an arbitrary byte sequence to a string, Kotlin tries to parse it as a Unicode sequence and effectively destroys our binary data. We need to create a second version of this function that uses a different argument type. Thankfully, this is also easy. We don’t need to create any extra custom header files. Instead, we can put extra C code directly into our definition file /src/nativeInterop/cinterop/bcm2835.def:
headers=bcm2835.h
package=bcm2835
staticLibraries=libbcm2835.a
libraryPaths=src/nativeInterop/cinterop

---

void bcm2835_spi_writenb_hacked(const int8_t* buf, uint32_t len) {
    bcm2835_spi_writenb((char*) buf, len);
}
The three dashes separate the declaration part from the custom C code. Now we have a way to apply workarounds in case the produced bindings don’t look as expected.
In short…
You can put additional custom C code into the definition files. It helps making workarounds, if the produced bindings don’t look as expected.
Summary
In this article, we covered two distinct topics: setting up the Raspberry Pi hardware, and preparing the Kotlin Native project in IntelliJ IDEA. We know how to build native applications in Kotlin, and how to cross-compile them for other hardware architectures. Moreover, we have an access to the rich world of C libraries. This is a good starting point for the next step. Here’s what to expect in the follow-up articles:
- Part 2: turning on SSD1306 display and showing a static, monochrome image on it
- Part 3:
using Ktor Client to fetch data over HTTP and showing them on the displayoverview of Kotlin multiplatform projects

wow, that’s nice, is there any reason why you use native library instead of JVM application? Do you think that raspberry is not capable of running JVM applications?
Good question. Raspberry Pi is perfectly capable to run JVM apps. In Model 3, the somehow limiting factor was the available amount of RAM (1 GB for the entire OS and all apps), but for Model 4, you can buy versions with up to 8 GB. There is also Pi4J project that allows using GPIO directly in JVM, it’s a Java wrapper around native libraries.
Here, I want to show a different flavor of Kotlin and explore the current capabilities of this ecosystem. In longer term, I also think of making versions of this project with GraalVM and JVM App + upcoming Project Panama, and Pi4J (depending on what would be technically possible) to give a broader overview of possible options.