
In my previous article I have described Jitsi Meet, an open source platform built to be an all-in-one video conferencing system. The article aims to familiarize us with the high-level components and helps us understand an extension scenario in which we needed to add a meeting reservation system to Jitsi. All changes discussed can be found in my GitHub repository here.
This article is meant to be a guide on how to extend Jitsi Meet, including playing around with Dockerized Ubuntu shells as well as modifying a React client portal to display our logo and new form necessary for meeting reservation to work. With this in mind – even if you are not DevOPS oriented you can still read along to understand the complexity of what is involved in making changes to Jitsi system.
Here is what I will go through in this article:
- We will clone the custom reservation system I built from my GitHub here.
- We will build a docker image for the Reservation System and store its content in .tar file
- We will run a virtual machine with a clean Ubuntu installation.
- We will copy our Docker image to the Ubuntu and run it there.
- We will setup and run Jitsi Platform docker image on the Ubuntu alongside our Reservation System.
- We will configure Jitsi Jicofo extension point to query our Reservation System to check for meetings eligibility.
Time to get our hands dirty with Ubuntu and Docker
First thing you will need to do is cloning my repository containing the reservation system and modified Jitsi Meet react app.
git clone https://github.com/nekon1987/jitsi-reservation-manager
In the jitsi-reservation-system subdirectory you will find the Visual Studio solution for the .Net Core WebApi2 project written in C#. This is the reservation system, it is implementing couple of standard reservation scenario endpoints written as per Jitsi documentation for REST API integration. The Solution contains a docker file – that’s the easiest way to package our system so we can run it on Ubuntu (you don’t have to do it but I decided it’s best for simplicity to have a reservation system on the same machine as Jitsi itself).
Let us build the docker file into a usable docker image tagged (-t) with the “jitsi-reservation-manager-1-0” label for readability:
docker build -t jitsi-reservation-manager-1-0 .
Image should now be available on local machine repository for docker to use, you can confirm this by listing all the available images:
docker images
Next, save the image to a file system so that we can move it to another machine (or a virtual machine hosting Ubuntu), you can do it with the following command:
docker save -o e:\jitsi-reservation-manager-1-0.tar jitsi-reservation-manager-1-0
Next thing to do is create a server to host Jitsi and our Reservation API. It does not have to be 1 server or a Hyper-V virtual machine but this is what I selected because of the setup simplicity. Microsoft greatly simplified the configuration of virtual machines in latest Windows 10. You can follow a guide here to do configure one yourself. Just make sure you select the LTS version (Long Term Support – 18.04.3 at the moment of writing this article) as its most stable and most software like Jitsi Meet was tested against it.
Once you install docker on your new Ubuntu instance, you can copy the previously created docker tar file from your local machine to the virtual machine. Once you do you can load the image to the local docker registry like so:
docker load -i /home/jitsi-images/jitsi-reservation-manager-1-0.tar
Once in the virtual machine docker registry, we can run this image with the handy:
docker run -d -p 8067:80 jitsi-reservation-manager-1-0
“d” stands for detached, so docker will not log us to the bash of the machine straightaway and the “p” allows us to expose port 80 on the docker container to the outside world as the 8067 (we do this because other apps on virtual machine may be using the standard port 80 and could cause us pain if we try to coexist on the same port.)
In case you need to login to the docker container running our image – perhaps to check diagnostics.log file (that’s the log file that Reservation System will create in its root folder inside the docker container), you can do it with the:
docker exec -it 7761bdf81ff1 /bin/bash
where 7761bdf81ff1 is an image id which you can find from running:
docker ps
Steps to setup Jitsi from docker
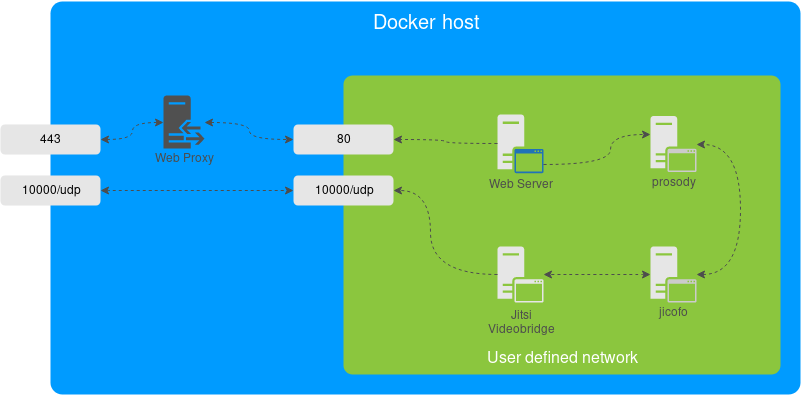
- Install docker-compose on your Ubuntu instance. Compose is a tool allowing for easier configuration of multiple docker containers in single YAML file. This is what Jitsi Meet uses since it does have a couple of separate components running in different containers (Web, Prosody, Bridge and Jicofo).
- Download and setup Jitsi Meet on Docker (follow the readme instructions – it’s pretty much straight forward)
- Before you run your docker compose you will have to make some edits in the .env file. Env file is used for configuration overrides of some commonly changed configuration values – you can change them here, and they will be applied on Jitsi configuration files on appropriate containers when you run the docker compose. Set JVB_ENABLE_APIS value to rest, colibri (docker will apply this value to the /etc/jitsi/videobridge/sip-communicator.properties file which is a main config for VideoBridge. This will later allow the bridge to communicate with the external world).
- Confirm that you can access Jitsi web interface at https://localhost:8443
- Now we need to link our Jicofo component with the Reservation API we have created. The file we need to change is located at /etc/jitsi/jicofo/sip-communicator.properties of the video bridge docker. The value that we need to add is: org.jitsi.impl.reservation.rest.BASE_URL=http://172.31.23.14:8067 where the IP and port number has to match our Reservation System host endpoint. This will make Jitcofo to ask our reservation system whether it should allow the user to create a new conference room. Of course, you don’t need to change the file inside of Jicofo container – there is a handy override value for this in our .env file “JICOFO_RESERVATION_REST_BASE_URL”.
Modifications to the JitsiMeet React app
Frontend app react files are located on jitsi/web docker image under the location: /usr/share/jitsi-meet/ it is easy to locate but setting it up for development can be challenging. I will assume you are working on a clean installation of Ubuntu LTS which is currently 18.04.3.
First you need to install a Node.js repository containing the new version of Node (node contains npm now).
curl -sL https://deb.nodesource.com/setup_10.x | sudo -E bash –
Next, install Node.js and compilers required for some of our dev packages.
sudo apt-get install -y nodejs
sudo apt-get install gcc g++ make
Confirm versions of node and npm, things will fail later if your versions are lower than ones below.
nodejs -v
v10.13.0
npm -v
6.4.1
Clone jitsi-meet source code containing our front end react application .
git clone https://github.com/jitsi/jitsi-meet.git
cd jitsi-meet/
Install all the node packages and run the make file which is a handy way of grouping commands together (make file will execute “ALL” command if one is provided as a parameter).
npm install
make
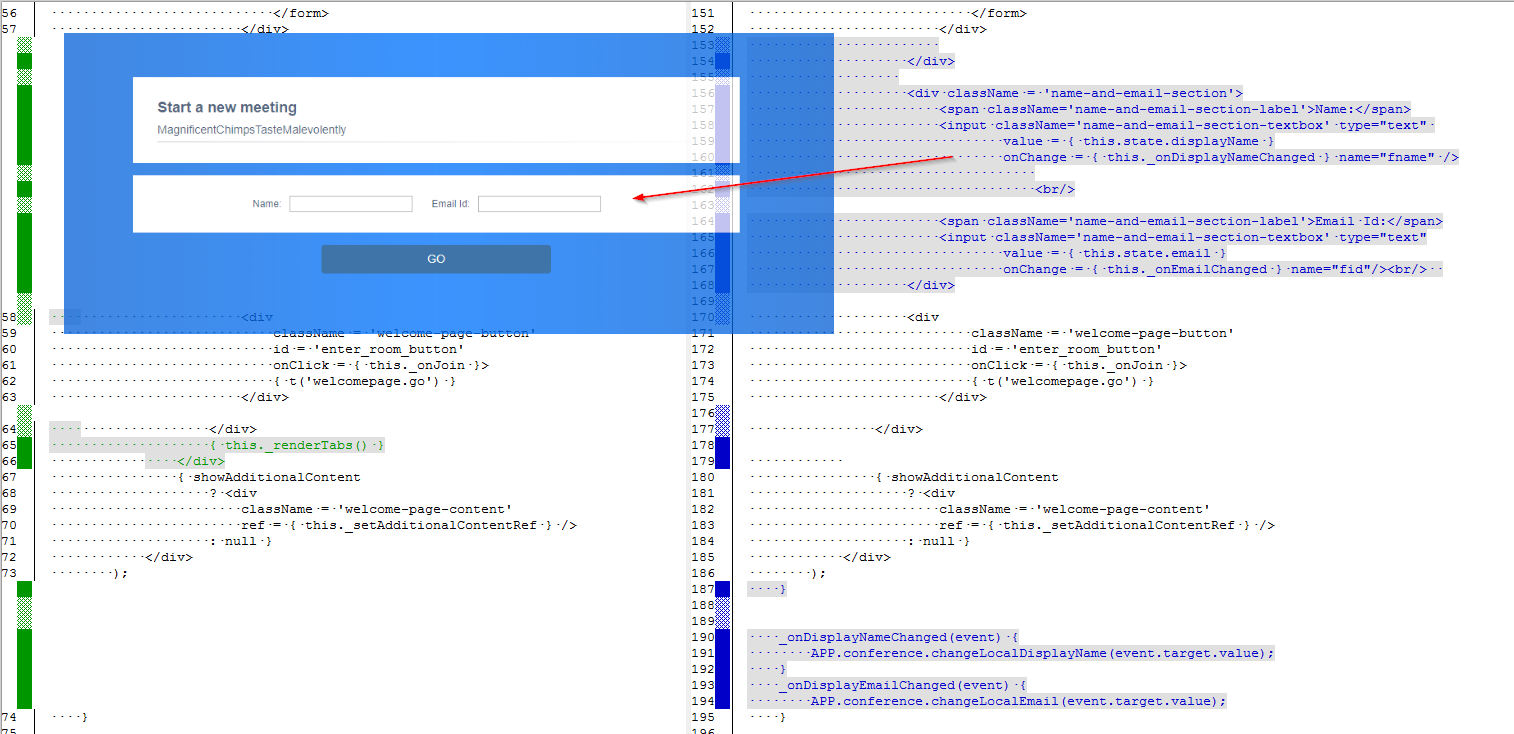
Now you can download your favourite code editor (I have chosen the visual studio code) and open the directory. Our react app sits under the “react” directory and the changes we want to apply will mostly be done in react\features\welcome\components\WelcomePage.web.js (again, you can find the modified code here: https://github.com/nekon1987/jitsi-reservation-manager). Our changes are simple, we are changing a logo located in /images and adding a section to the welcome page which will allow users to pass their Name and Email:
You can run the code in dev by typing:
make dev
and if you want to build it for release, simply type:
make compile
make deploy-css
make deploy
Reservation Manager API Endpoints
Given below is some basic description of endpoints implemented by our reservation API:
Api/Conference
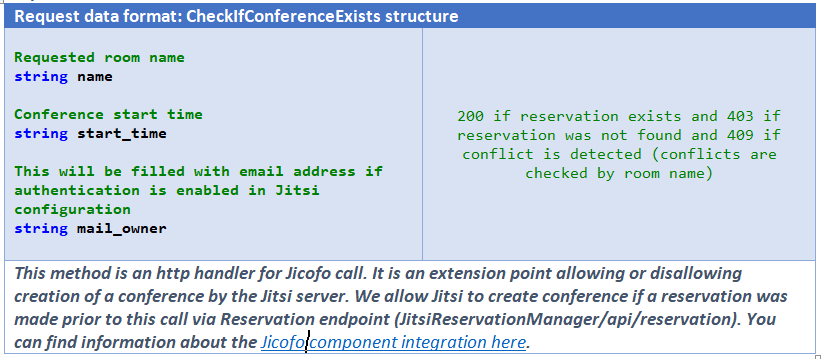
This endpoint will be called by Jitsi internally so we do not have to worry about them but it is useful to know what they do under the hood. Given below is a simple description of key methods:
Http Verb: POST
Http Verb: GET

Http Verb: DELETE

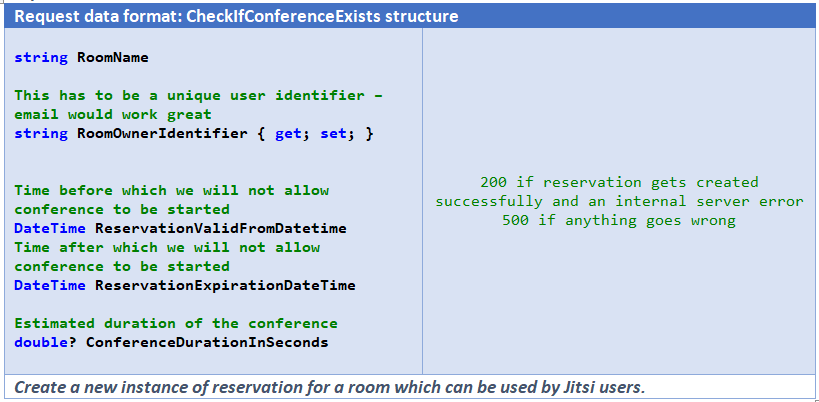
Api/Reservation
Reservation API has a basic CRUD operation for our Reservation objects, the most important one is the POST method which creates the reservation – without it users would not be able to join a conference.
Http Verb: POST
Summing up
I will admit this article is slightly more technical than I am comfortable with writing but at the moment no documentation exists for step-by-step extension of Jitsi with reservation systems. I hope someone will find this useful, and if so, please let me know your thoughts in the comments box below
Author of this blog is Patryk Borowa, Aspire Systems.