Playwright meets JUnit 5
Playwright is a Node.js-based tool for automating browsers. It supports all modern rendering engines including Chromium, WebKit and Firefox. Playwright can be used with JavaScript, TypeScript, Python, .NET and Java. In this tutorial, we will explore the setup of a test automation project using Playwright for Java, JUnit 5 and Gradle. You will also learn some basics of Playwright tools like codegen, Playwright Inspector and trace viewer. I will also provide some basic setup for Docker as well as GitHub Actions. Let's get started!
Table of contents
- Introduction
- Source code
- Prerequisites
- Setting up the project with
Gradle JUnit 5meetsPlaywrightPage Objectpattern withPlaywright- Parallel tests execution
- Basic
GitHub Actionsworkflow PlaywrightforJavaandDocker- Conclusion
- References
Introduction
Disclaimer
The project setup presented in this article is based on
Gradle, but it should be noted thatPlaywrightforJavais intended to be used withMaven, as indicated in the project documentation and source code. If you are considering usingPlaywrightforJavafor your next project, consider usingMaven.The setup presented in this article is a result of my eagerness to learn and experiment with
PlaywrightforJava. However, please note that some aspects of the setup may not be future-proof. If you have any suggestions or improvements, please feel free to contact me via Twitter, LinkedIn, or report an issue in the project repository.This article was edited and proofread with the help of
ChatGPT, to ensure that it is well-written and error-free. However, please note that the content and ideas presented in this article are solely mine, and any opinions expressed are my own. The AI language model was used purely for editing purposes and did not influence the content of this article in any way.
Why Playwright?
I started using Playwright (with Node.js) in June 2022, and I'm really impressed with this tool. Here are some of the features I find most important about Playwright:
Easy to use: One of the best things about
Playwrightis that it's packaged all in one and easy to set up and use. Unlike withSelenium, there's no need to integrate different tools together.Multi-language support:
Playwrightsupports several programming languages, includingJavaScript,TypeScript,Python,.NET, andJava. While the nativeNode.jsversion provides the best experience, in my opinion, because of its built-in test runner with powerful configuration and reporting capabilities,Playwrightmakes it easier for developers to write tests in the language they're most comfortable with.Multi-browser support:
PlaywrightsupportsChromium,Firefox,WebKit, andOpera. Configuration is easy, and there's no need to install additional drivers or consult third-party documentation. All these browsers' drivers are maintained by the same team.Auto-wait functionality:
Playwrightautomatically waits for page elements to be visible and interactive before performing actions on them. This helps avoid flakiness in tests and makes them more reliable.Page and browser context isolation:
Playwrightallows you to create multiple browser contexts and isolate tests from each other easily. This provides more robustness and stability when running tests.Tooling:
Playwrightcomes with tools that make it easy to manage and execute tests from the command line, and integrate with build systems and automation tools. Codegen is one such tool that allows you to record your interactions with a web application and generate the code automatically.Architecture and limitations: Unlike
Cypress, which runs tests in the same runtime as the application being tested,Playwrightruns tests in a separate process. This provides more isolation and avoids potential issues.Playwrighthas no problems with running tests in parallel, which can be an issue withCypressunless you pay.Documentation: The
Playwrightdocumentation is well-organized, easy to navigate, and understand. It contains a lot of examples and code snippets. I found it very helpful and was able to find what I needed without any problems. There are topics thought that are not that well explained or lack information (like for exampleDockersection), but I'm sure it will be improved in the future.
Playwright: Java vs Node.js
Although I don't have much experience with the Java version of Playwright yet, I can say that as it goes to the API it is very similar to the Node.js version. The main difference is that the Java version does not have a built-in test runner, so you have to use a third-party one, such as JUnit 5. And Node.js built-in test runner provides a lot of useful features such as:
- Visual testing out of the box via
expectAPI. - A lot of configuration options like timeout, retries, headless mode, browsers, viewports, reporters and much more.
- Easily configurable tracing and video recording.
- Built-in reporters including the
HTMLreporter.
Why Playwright for Java?
Although the Node.js version currently appears to be superior to the Java version, I believe it is still worthwhile to consider using Playwright for Java. Here are some reasons why I think it is a relevant option:
I think that
PlaywrightforJavacan be a modern, reliable, and user-friendly alternative toSeleniumfor end-to-end testing inJava-basedprojects - only if you are ready for some compromises and extra work around configuration.I believe that some teams may not be able to use
Node.jsfor various reasons, soPlaywrightforJavacould be a good alternative.PlaywrightforJavacan be used as a tool for automating tasks (like crawling web pages, scraping data, etc.) and not necessary to create end-to-end tests. If so, the lack of a built-in test runner is not a problem.
Source code
The complete code for this article can be found on GitHub: junit5-playwright-demo.
Prerequisites
What you need to get started:
- Terminal of your choice
- Git
- Java 17 or higher
- IntelliJ IDEA (or any other IDE of your choice)
For
JavaI recommendasdfversion manager. You can find more information about on my blog: Manage multiple Java SDKs with asdf with ease .
Setting up the project with Gradle
To speed up the process of setting up the project, I will use the junit5-gradle-template
repository. It is a template project for JUnit 5 and Gradle specifically.
Note: There is also an official starter by
JUnitteam that can be found here: junit5-jupiter-starter-gradle
Steps:
- Clone the template repository:
git clone --depth=0 https://github.com/kolorobot/junit5-gradle-template my-playwright-project && cd my-playwright-project - Remove the
.gitdirectory:rm -rf .git - Execute
./gradlew clean testto verify that everything works as expected - Import project to your IDE
Adding Playwright dependency
To use Playwright with Java, we need to add the playwright dependency to build.gradle file:
buildscript {
    ext {
        playwrightVersion = '1.30.0'
    }
}

implementation "com.microsoft.playwright:playwright:${playwrightVersion}"
The library is added as implementation dependency, so it will be available in the runtime classpath as well. This will allow us to use the library not only in our tests, but also in our application code.
Playwright without a test runner
With dependency added, we can create a simple app that will open a browser and navigate to a website.
- Create a new package in
src/main/javadirectory (e.g.pl.codeleak.demos.playwright) - Create a new class
Appin that package and add the following code:
package pl.codeleak.demos.playwright;

import com.microsoft.playwright.Browser;
import com.microsoft.playwright.BrowserType;
import com.microsoft.playwright.Page;
import com.microsoft.playwright.Playwright;

public class App {
    public static void main(String[] args) {
        try (Playwright playwright = Playwright.create()) {
            Browser browser = playwright.chromium().launch();
            Page page = browser.newPage();

            page.navigate("https://blog.codeleak.pl/");
            System.out.println(page.title());
        }
    }
}
The above code creates a Playwright instance and launches a browser (in this case, Chromium) in headless mode and creates a new page.
The page navigates to a website, gets its title and prints it to the console. The code uses a try-with-resources statement, which automatically closes the playwright object when the try block is finished.
To run the browser in non-headless mode, we can modify the code as follows:
package pl.codeleak.demos.playwright;

import com.microsoft.playwright.Browser;
import com.microsoft.playwright.BrowserType;
import com.microsoft.playwright.Page;
import com.microsoft.playwright.Playwright;

public class App {
    public static void main(String[] args) {
        BrowserType.LaunchOptions launchOptions = new BrowserType.LaunchOptions()
                .setHeadless(false);

        try (Playwright playwright = Playwright.create()) {
            Browser browser = playwright.chromium().launch(launchOptions);
            Page page = browser.newPage();

            page.navigate("https://blog.codeleak.pl/");
            System.out.println(page.title());
        }
    }
}
To run the app, we can use run command, but first we need to modify build.gradle file and configure the application plugin:
plugins {
    id("application")
}

application {
    mainClass = "pl.codeleak.demos.playwright.App"
}
Now, we can run the app with ./gradlew run command.
❯ ./gradlew run

> Task :run
blog.codeleak.pl

BUILD SUCCESSFUL in 5s
2 actionable tasks: 1 executed, 1 up-to-date
Running Playwright CLI tools with Gradle
Playwright comes with a CLI tools that can be useful for code generation, running and debugging tests or viewing the traces.
To run Playwright CLI with Gradle, we need to modify build.gradle, add application plugin, and create a custom playwright task that executes com.microsoft.playwright.CLI:
apply plugin: 'application'

tasks.register('playwright', JavaExec) {
    classpath = sourceSets.main.runtimeClasspath
    mainClass = 'com.microsoft.playwright.CLI'
}
Now, we can run Playwright CLI with Gradle:
./gradlew playwright --args="--help"
Generate code with codegen
As we set up the Playwright CLI, we can use it to run codegen command. codegen is a tool that can generate code snippets for you based on the user interactions with a website using Playwright Inspector. It allows you to record your interactions with a web page and then generate code snippets in Java that can be used to automate those interactions.
As per the official documentation,
Playwright Inspectoris a GUI tool that helps writing and debugging Playwright scripts. That's our default recommended tool for scripts troubleshooting.
To learn more about codegen tool and its options, we can execute the following command:
./gradlew playwright --args="codegen --help"
As you observe the output, the codegen command provides plenty of options. For example, we can specify the browser to use or the device to emulate, etc. Let's try:
./gradlew playwright --args="codegen --browser chromium --device 'iPhone 13' https://blog.codeleak.pl/"
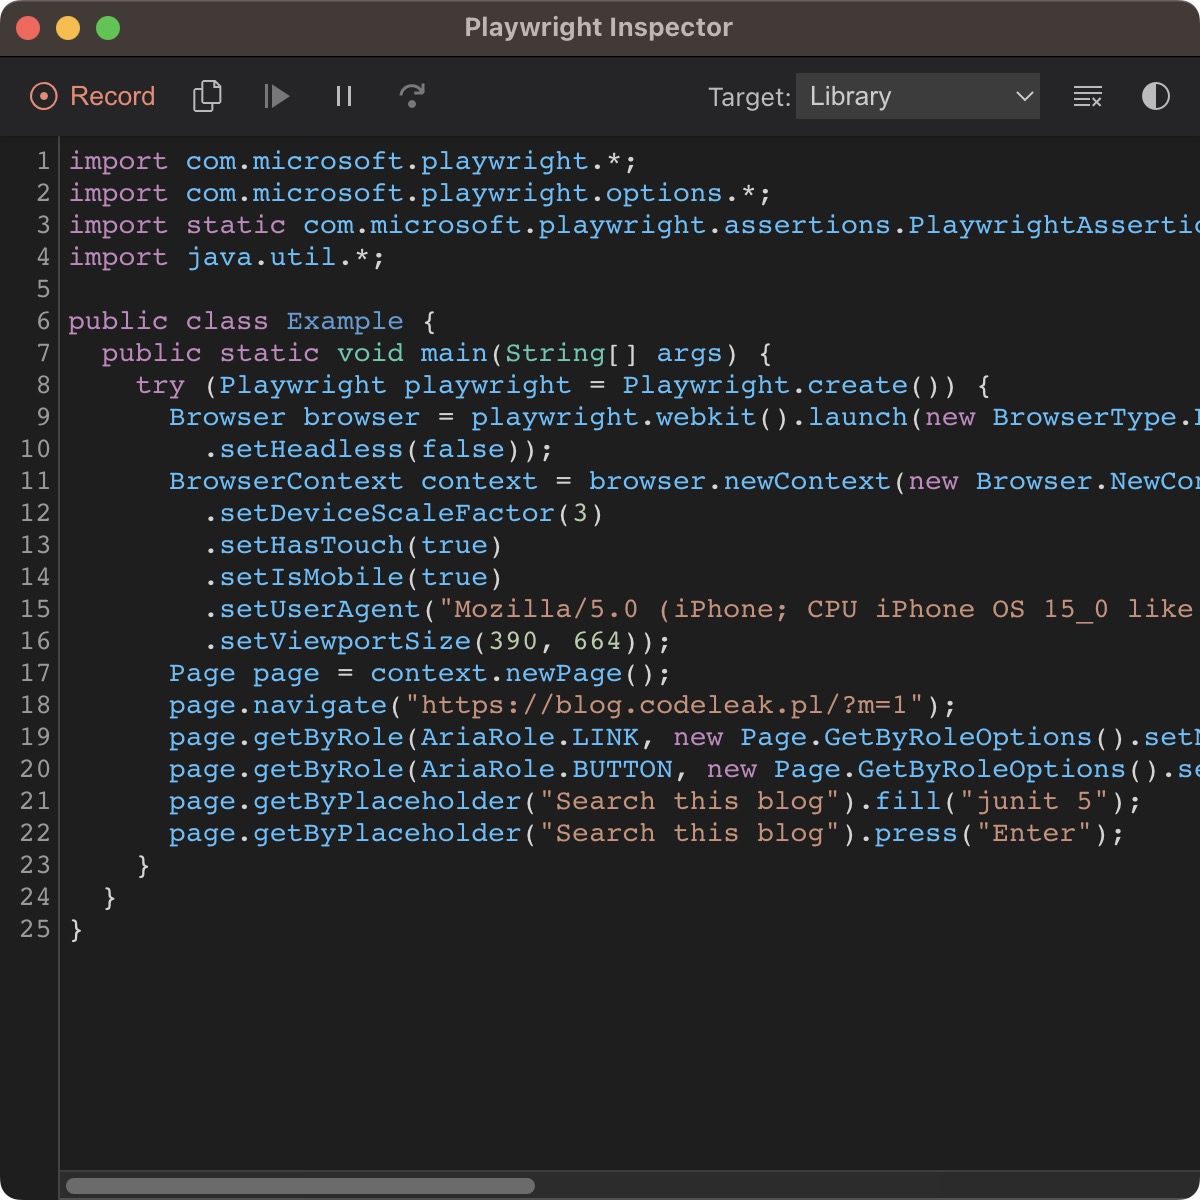
Once the above command is executed, two windows will be opened: Playwright Inspector and the browser that will be navigated to the specified URL. Now, we can interact with the website and the codegen will generate code snippets for us. Once we are done with the interaction, we can copy the code and use it in our scripts.
JUnit 5 meets Playwright
Setting up the base Playwright test
In the previous section, we learned how to use Playwright as browser tool in a simple application. Now, we will learn how to use it with JUnit 5.
Let's create a base test class that will be used by all our tests. It will set up Playwright and create a browser instance. The base test class will also create a new browser context and a new page for each test method.
@TestInstance(TestInstance.Lifecycle.PER_CLASS)
abstract class PlaywrightTest {

    Playwright playwright;
    Browser browser;

    BrowserContext context;
    Page page;

    @BeforeAll
    void launchBrowser() {
        playwright = Playwright.create();
        browser = playwright.chromium().launch();
    }

    @AfterAll
    void closeBrowser() {
        browser.close();
        playwright.close();
    }

    @BeforeEach
    void createBrowserContext() {
        context = browser.newContext();
        page = context.newPage();
    }

    @AfterEach
    void closeBrowserContext() {
        page.close();
        context.close();
    }
}
Let's quickly examine the above code:
- The class is annotated with
@TestInstance(TestInstance.Lifecycle.PER_CLASS), which means that only one instance of the test class is created for all test methods, and the same instance is used for all test methods in the class. - The class has four
JUnit 5lifecycle methods:@BeforeAll: thelaunchBrowsermethod launches aChromiumbrowser usingPlaywright. It is executed before all test methods in the class.@AfterAll: thecloseBrowsermethod closes thebrowserandPlaywrightgracefully. It is executed after all test methods in the class.@BeforeEach: thecreateBrowserContextmethod creates a new browser context and a new page object for interacting with a browser. It is executed before each test method in the class.@AfterEach: thecloseBrowserContextmethod closes the page and context after each test.
To set the default test instance lifecycle to PER_CLASS for all tests in JUnit 5, create a file called junit-platform.properties in src/test/resources with the following content:
junit.jupiter.testinstance.lifecycle.default=per_class
JUnit 5is the latest version of the popular JUnit testing framework. It is a complete rewrite of the original JUnit 4 framework.JUnit 5is the first version of JUnit to support Java 8 features such as lambda expressions and default methods. If you are not familiar withJUnit 5, you can check my JUnit 5 - Quick Tutorial post.
Creating a first test
Now, we can create our first test. Let's create a test class that extends the PlaywrightTest class and create a simple test that navigates to this blog and searches for "junit 5" term. The test class will look like this:
package pl.codeleak.demos.playwright;
import org.junit.jupiter.api.Test;
import static com.microsoft.playwright.assertions.PlaywrightAssertions.assertThat;

class BlogSearchTest extends PlaywrightTest {

    @Test
    void searchesForTermAndGetsResults() {
        page.navigate("https://blog.codeleak.pl");
        page.locator("button[aria-label='Search']").click();
        page.getByPlaceholder("Search this blog").fill("junit 5");
        page.getByPlaceholder("Search this blog").press("Enter");

        assertThat(page).hasURL("https://blog.codeleak.pl/search?q=junit+5");
        assertThat(page.locator("article .post")).hasCount(20);
        assertThat(page.getByText("Show posts matching the search for junit 5"))
                .isVisible();
    }
}
Let's quickly examine the above code:
- The test class extends the
PlaywrightTestclass, which means that it inherits all the setup and teardown methods. - The test method uses the
pageobject to navigate to the blog, clicks the search button, fills the search input and press theEnterkey. - It uses
Playwrightbuilt-in assertions to check that:- the URL contains the search term
- the search results are displayed and there are 20 of them
- the search results header is visible
Now, we can run the test and observe the result:
./gradlew test --tests BlogSearchTest

> Task :test

BlogSearchTest > searchesForTermAndGetsResults() FAILED
    org.opentest4j.AssertionFailedError at BlogSearchTest.java:19

1 test completed, 1 failed

> Task :test FAILED

FAILURE: Build failed with an exception.

* What went wrong:
Execution failed for task ':test'.
> There were failing tests. See the report at: file:///build/reports/tests/test/index.html
Oops, the test failed (at least it should). You can examine the report at build/reports/tests/test/index.html to see the details. The reason of failure can be quickly seen in the report:
org.opentest4j.AssertionFailedError: Locator expected to be visible
Call log:
Locator.expect with timeout 5000ms
waiting for getByText("Show posts matching the search for junit 5")
As you can see, the test failed because the expected search results header is not visible. To fix this we can examine the application by manually executing the scenario, we can debug the test in IDE, or we can run the test in a debug mode with Playwright.
Let's try the last option to learn more about Playwright Inspector.
Debugging the test with Playwright Inspector
You are already familiar with Playwright Inspector from the previous section. Now, we can use it to debug our test. To do that, we need to run the test in a debug mode:
PWDEBUG=1 PLAYWRIGHT_JAVA_SRC=./src/test/java ./gradlew test --tests BlogSearchTest
PWDEBUG=1enables the debug mode and starts the browser in headed mode (you may recall that the base class launches the browser in headless mode).PLAYWRIGHT_JAVA_SRC=./src/test/javatells Playwright to use the source code from thesrc/test/javadirectory. It is needed to be able to see the source code in thePlaywright Inspector.
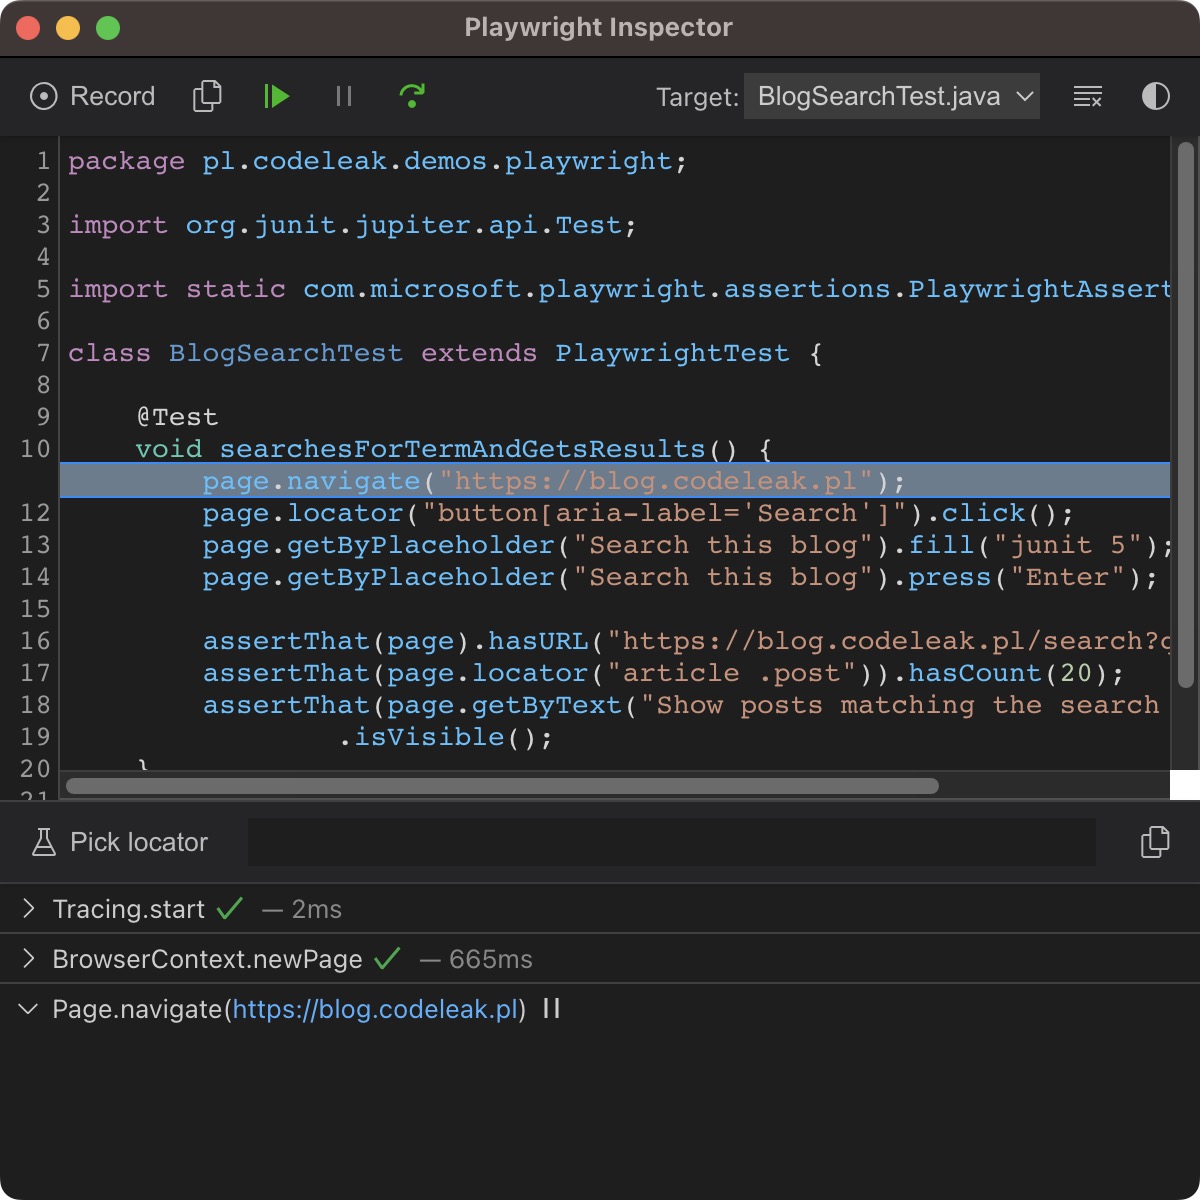
The inspector opens a browser window and highlights elements as the test is being executed. The toolbar provides options to play the test, step through each action using Step over, or resume the script. You have access to Actionability Logs that provide some useful info about actions being performed. You can also examine the page by using the Explore option. Last but not least, you can use the browser developer tools.
Recording a trace
You can also record a trace of the test execution. To do that, you need to use BrowserContext.tracing() API. Modify @BeforeEach and @AfterEach annotated methods in PlaywrightTest as follows:
@BeforeEach
void createBrowserContext() {
    context = browser.newContext();
    context.tracing().start(new Tracing.StartOptions()
            .setScreenshots(true)
            .setSnapshots(true));
    page = context.newPage();
}

@AfterEach
void closeBrowserContext(TestInfo testInfo) {
    var traceName = testInfo.getTestClass().get().getSimpleName() +
            "-" + testInfo.getTestMethod().get().getName() + "-trace.zip";
    context.tracing().stop(new Tracing.StopOptions()
            .setPath(Paths.get("build/reports/traces/" + traceName)));

    page.close();
    context.close();
}
Once you re-run the test, you will find the trace in the build/reports/traces directory. You can open it in the trace-view tool like this:
./gradlew playwright --args="show-trace build/reports/traces/BlogSearchTest-searchesForTermAndGetsResults-trace.zip"
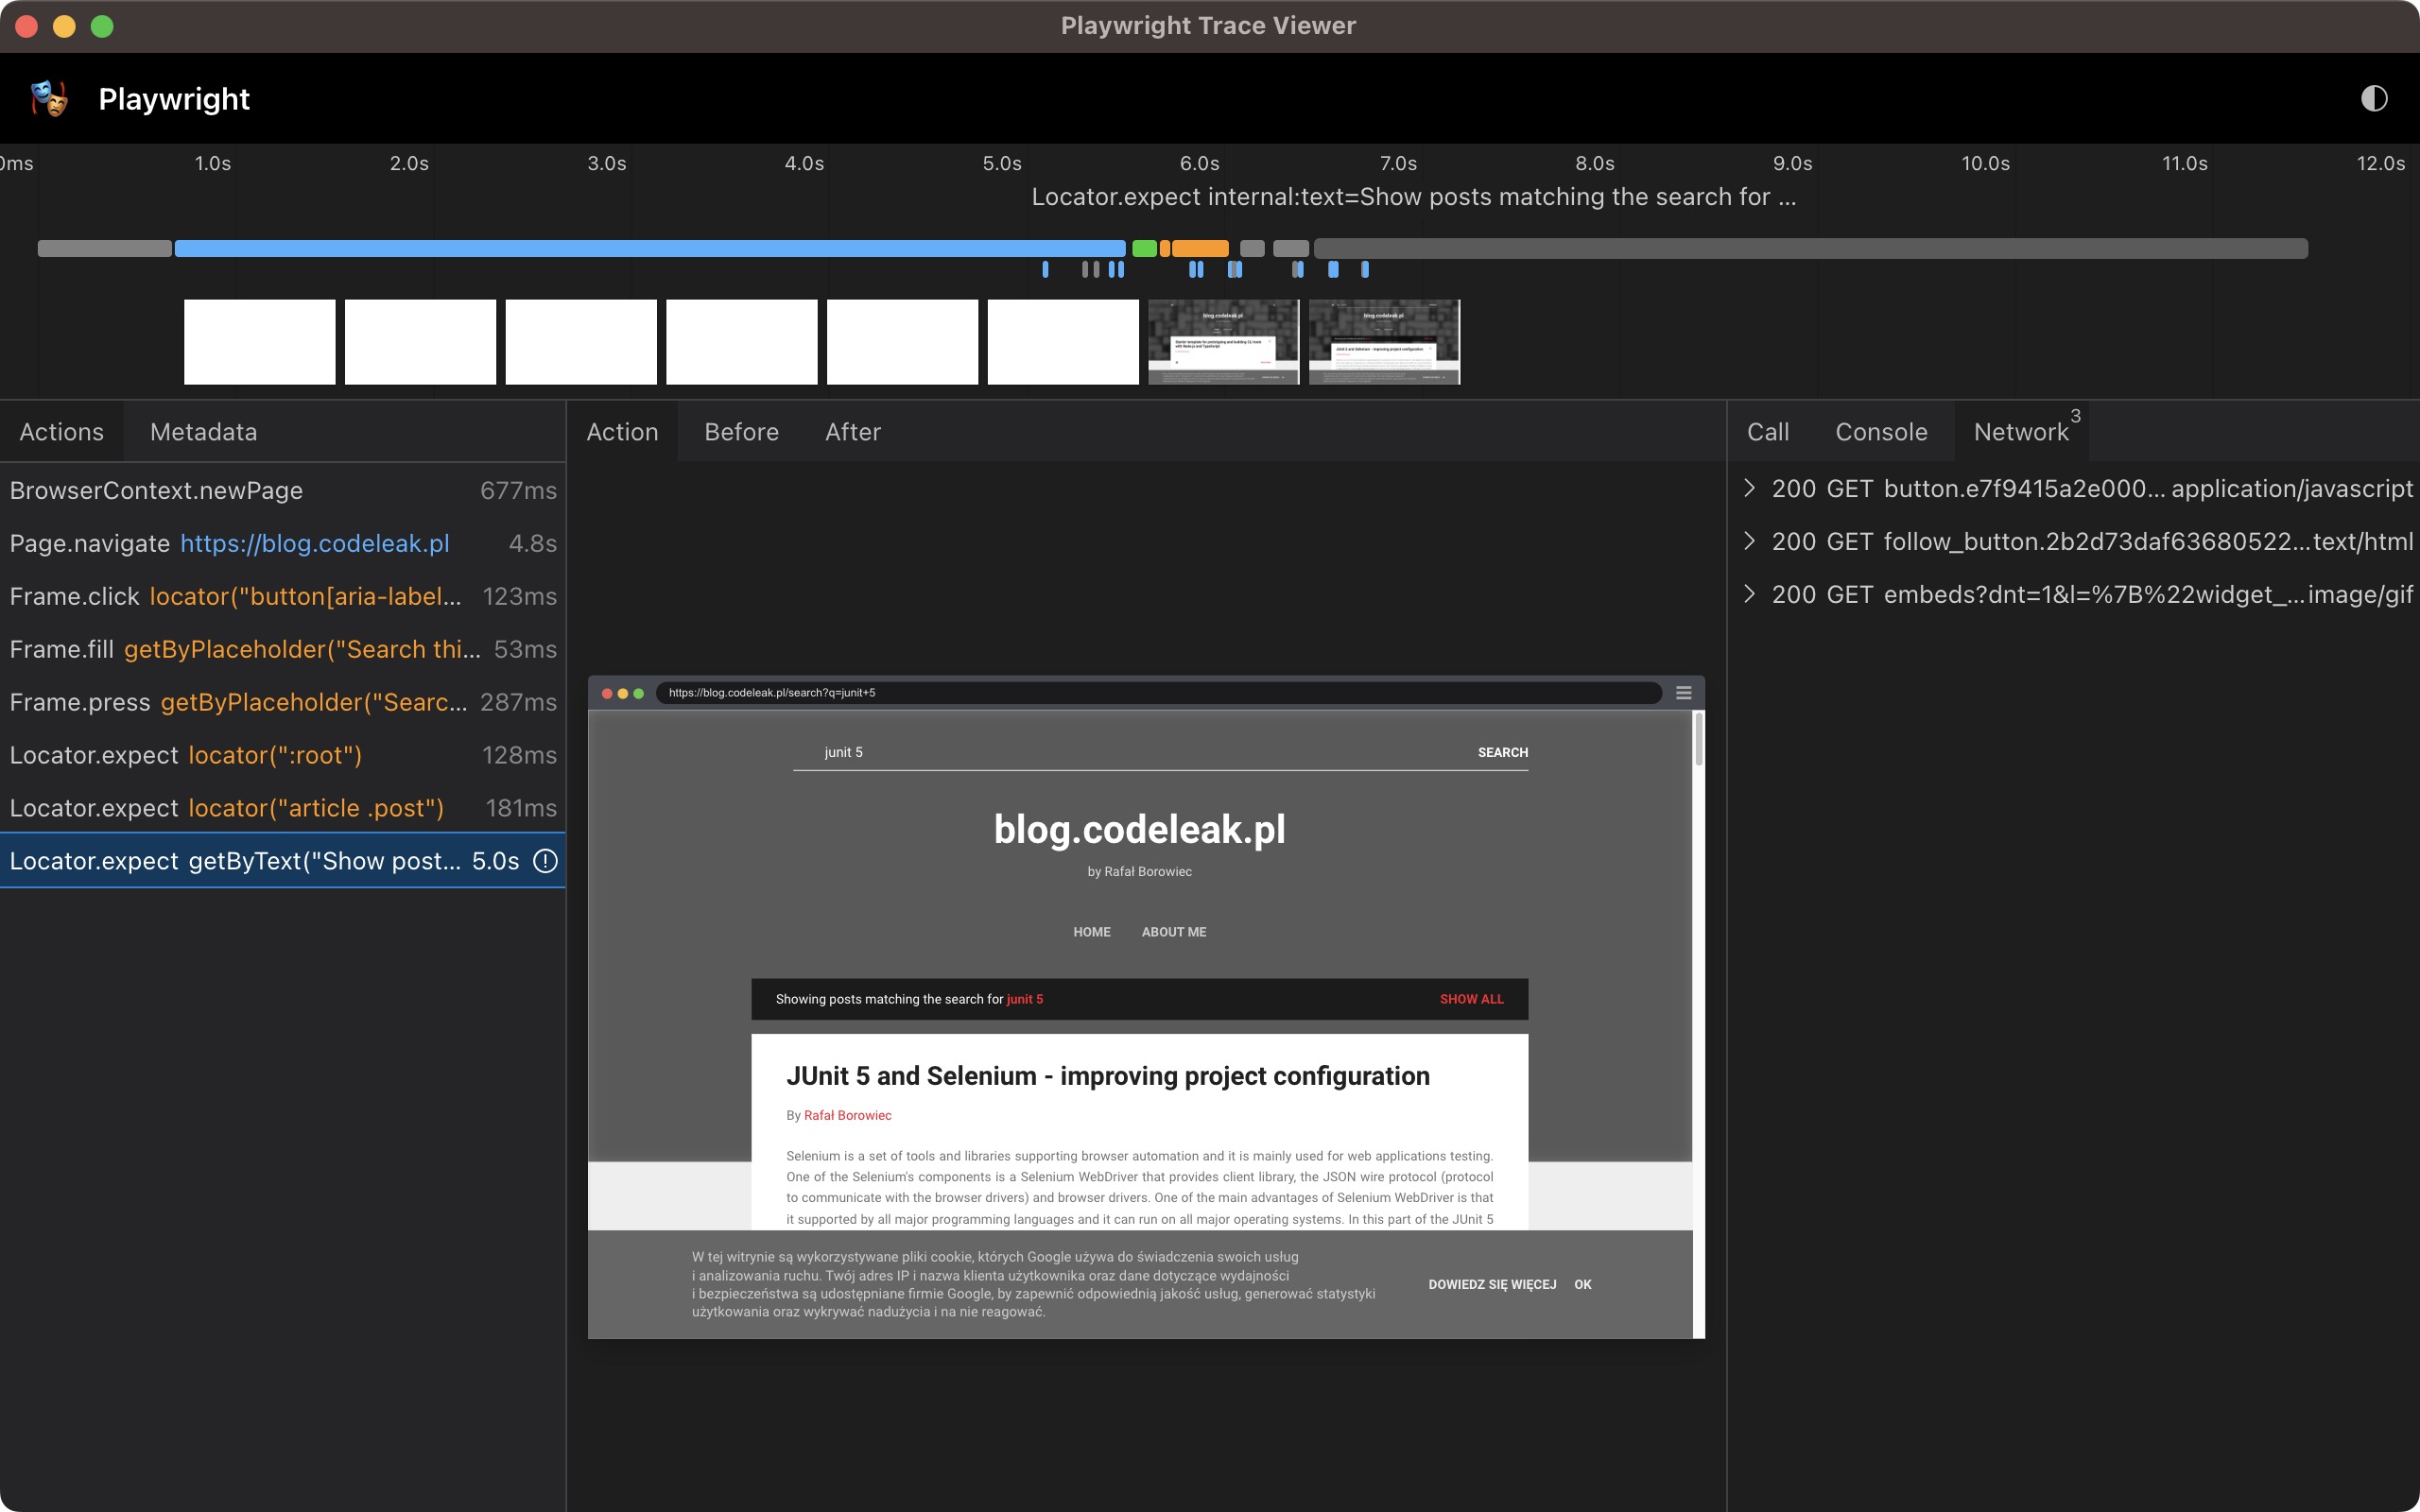
Fixing the test
Since we located the reason test was failing, we can fix it by modifying the last assertion (the text should be: "Showing posts matching the search for junit 5":
assertThat(page.getByText("Showing posts matching the search for junit 5"))
        .isVisible();
Page Object pattern with Playwright
Once the first test is passing, we can move on to the next one. This time will be creating tests for TodoMVC Vanilla.js-based application available here: http://todomvc.com/examples/vanillajs. The application is a Single Page Application (SPA) and uses local storage as a task repository. The possible scenarios to be implemented include adding and editing todo, removing todo, marking single or multiple todos as done. The implementation will be done using Page Object patternakaPOP`.
The goal of POP is to abstract the application pages and functionality from the actual tests. POP improves re-usability of the code across tests and fixtures but also makes the code easier to maintain.
Let's create an interface with the methods that represent scenarios that we will be automating:
package pl.codeleak.demos.playwright;

import java.util.List;

interface TodoMvc {
    void navigateTo();
    void createTodo(String todoName);
    void createTodos(String... todoNames);
    int getTodosLeft();
    boolean todoExists(String todoName);
    int getTodoCount();
    List<String> getTodos();
    void renameTodo(String todoName, String newTodoName);
    void removeTodo(String todoName);
    void completeTodo(String todoName);
    void completeAllTodos();
    void showActive();
    void showCompleted();
    void clearCompleted();
}
Implementing TodoMVC page API
We will create a class TodoMvcPage that will implement the TodoMvc interface:
package pl.codeleak.demos.playwright;

import com.microsoft.playwright.Locator;
import com.microsoft.playwright.Page;

import java.util.List;
import java.util.Objects;

public class TodoMvcPage implements TodoMvc {

    private Page page;

    public TodoMvcPage(Page page) {
        Objects.requireNonNull(page, "Page is required");
        this.page = page;
    }

    @Override
    public void navigateTo() {
        page.navigate("https://todomvc.com/examples/vanillajs");
    }

    public void createTodo(String todoName) {
        page.locator(".new-todo").type(todoName);
        page.locator(".new-todo").press("Enter");
    }

    public void createTodos(String... todoNames) {
        for (String todoName : todoNames) {
            createTodo(todoName);
        }
    }

    public int getTodosLeft() {
        return Integer.parseInt(page.locator(".todo-count > strong").textContent());
    }

    public boolean todoExists(String todoName) {
        return getTodos().stream().anyMatch(todoName::equals);
    }

    public int getTodoCount() {
        return page.locator(".todo-list li").count();
    }

    public List<String> getTodos() {
        return page.locator(".todo-list li")
                .allTextContents();
    }

    public void renameTodo(String todoName, String newTodoName) {
        Locator todoToEdit = getTodoElementByName(todoName);
        todoToEdit.dblclick();
        Locator todoEditInput = todoToEdit.locator("input.edit");
        todoEditInput.clear();
        todoToEdit.type(newTodoName);
        todoToEdit.press("Enter");
    }

    public void removeTodo(String todoName) {
        Locator todoToRemove = getTodoElementByName(todoName);
        todoToRemove.hover();
        todoToRemove.locator("button.destroy").click();
    }

    public void completeTodo(String todoName) {
        Locator todoToComplete = getTodoElementByName(todoName);
        todoToComplete.locator("input.toggle").click();
    }

    public void completeAllTodos() {
        page.locator(".toggle-all").click();
    }

    public void showActive() {
        page.locator("a[href='#/active']").click();
    }

    public void showCompleted() {
        page.locator("a[href='#/completed']").click();
    }

    public void clearCompleted() {
        page.locator(".clear-completed").click();
    }

    private Locator getTodoElementByName(String todoName) {
        return page.locator(".todo-list li")
                .all()
                .stream()
                .filter(locator -> todoName.equals(locator.textContent()))
                .findFirst()
                .orElseThrow(() -> new RuntimeException("Todo with name " + todoName + " not found!"));
    }
}
First, we navigate to the application using navigate method. Elements on that page are located using the locator method of the Playwrights Page object. This method takes a selector (in this case CSS selector) as an argument and returns a Locator object that represents the set of elements matching that selector. The returned Locator object provides methods to interact with the located elements, such as count (returns the number of elements), textContent (returns the text content of the first element), allTextContents (returns a list of text contents of all elements), click and dbclick (simulates a click event on the first element), clear (clears the content of the first element), and type (types text into the first element).
Read more about locators in the
Playwrightdocumentation here and here, and about actions here.
Creating TodoMVC tests
Before creating actual tests, let's add AssertJ to our project. We will use it to make assertions in our tests.
Add the following dependency to build.gradle:
buildscript {
    ext {
        assertJVersion = '3.21.0'
    }
}

dependencies {
    testImplementation "org.assertj:assertj-core:${assertJVersion}"
}
Now, we are ready to create the test class. Let's see the code:
package pl.codeleak.demos.playwright;

import org.junit.jupiter.api.*;

import static org.assertj.core.api.Assertions.assertThat;
import static org.junit.jupiter.api.Assertions.assertAll;

@DisplayName("Managing Todos")
class TodoMvcTests extends PlaywrightTest {

    TodoMvc todoMvc;

    private final String buyTheMilk = "Buy the milk";
    private final String cleanupTheRoom = "Clean up the room";
    private final String readTheBook = "Read the book";

    @BeforeEach
    void navigateTo() {
        todoMvc = new TodoMvcPage(page);
        todoMvc.navigateTo();
    }

    @Test
    @DisplayName("Creates Todo with given name")
    void createsTodo() {
        // act
        todoMvc.createTodo(buyTheMilk);
        // assert
        assertAll(
                () -> assertThat(todoMvc.getTodosLeft()).isOne(),
                () -> assertThat(todoMvc.todoExists(buyTheMilk)).isTrue()
        );
    }

    @Test
    @DisplayName("Edits inline double-clicked Todo")
    void editsTodo() {
        // arrange
        todoMvc.createTodos(buyTheMilk, cleanupTheRoom);
        // act
        todoMvc.renameTodo(buyTheMilk, readTheBook);
        // assert
        assertAll(
                () -> assertThat(todoMvc.todoExists(buyTheMilk)).isFalse(),
                () -> assertThat(todoMvc.todoExists(readTheBook)).isTrue(),
                () -> assertThat(todoMvc.todoExists(cleanupTheRoom)).isTrue()
        );
    }

    @Test
    @DisplayName("Removes selected Todo")
    void removesTodo() {
        // arrange
        todoMvc.createTodos(buyTheMilk, cleanupTheRoom, readTheBook);
        // act
        todoMvc.removeTodo(buyTheMilk);
        // assert
        assertAll(
                () -> assertThat(todoMvc.todoExists(buyTheMilk)).isFalse(),
                () -> assertThat(todoMvc.todoExists(cleanupTheRoom)).isTrue(),
                () -> assertThat(todoMvc.todoExists(readTheBook)).isTrue()
        );
    }

    @Test
    @DisplayName("Toggles selected Todo as completed")
    void togglesTodoCompleted() {
        todoMvc.createTodos(buyTheMilk, cleanupTheRoom, readTheBook);

        todoMvc.completeTodo(buyTheMilk);
        assertThat(todoMvc.getTodosLeft()).isEqualTo(2);

        todoMvc.showCompleted();
        assertThat(todoMvc.getTodoCount()).isOne();

        todoMvc.showActive();
        assertThat(todoMvc.getTodoCount()).isEqualTo(2);
    }

    // The rest of the tests omitted for brevity.
}
Let's examine the code a bit:
- The
navigateTomethod will be called before each test, but after lifecycle methods defined in the base class. It will create a new instance ofTodoMvcPageclass and navigate to the TodoMVC application. - The
@DisplayNameannotation is used to provide a more descriptive name for the test. It will be displayed in the test report. - The
assertAllmethod is used to group assertions. It will fail the test if any of the assertions fails. This is JUnit 5 feature. - The
assertThatmethod is used to make assertions. It is provided byAssertJlibrary. NoPlaywrightbuilt-in assertions are used as we want to keep the test code independent of the underlying implementation.
Note:
TodoMvcinterface as well as the test was adopted from the code I created for my Selenium and JUnit 5 tutorial. The tutorial can be found here and the source code here.
Running the tests
To run the tests, execute the following command:
./gradlew test --tests TodoMvcTests

> Task :test

Managing Todos > Creates Todo with given name PASSED
Managing Todos > Creates Todos all with the same name PASSED
Managing Todos > Edits inline double-clicked Todo PASSED
Managing Todos > Removes selected Todo PASSED
Managing Todos > Toggles selected Todo as completed PASSED
Managing Todos > Toggles all Todos as completed PASSED
Managing Todos > Clears all completed Todos PASSED

BUILD SUCCESSFUL in 9s
Parameterized tests
The general idea of parameterized unit tests is to run the same test method for different test data. To create a parameterized test in JUnit 5 you annotate a test method with @ParameterizedTest and provide the argument source for the test method. There are several argument sources available including:
@ValueSource- provided access to array of literal values i.e.shorts,ints,stringsetc.@MethodSource- provides access to values returned from factory methods@CsvSource- which reads comma-separated values (CSV) from one or more supplied CSV lines@CsvFileSource- which is used to load comma-separated value (CSV) files
Create test data
In our example, we will use CSV file as a source of test data with the following content:
todo;done
Buy the milk;false
Clean up the room;true
Read the book;false
Add this file to the src/test/resources directory.
Add dependency
To use parameterized tests, we need to add the following dependency to the build.gradle file:
testImplementation "org.junit.jupiter:junit-jupiter-params:${junitJupiterVersion}"
Create tests
To create a parameterized test, we need to annotate the test method with @ParameterizedTest and provide the argument source. The complete source code of the TodoMvcParameterizedTests class is shown below:
package pl.codeleak.demos.playwright;

import org.junit.jupiter.api.BeforeEach;
import org.junit.jupiter.api.DisplayName;
import org.junit.jupiter.params.ParameterizedTest;
import org.junit.jupiter.params.provider.CsvFileSource;

import static org.assertj.core.api.Assertions.assertThat;
import static org.junit.jupiter.api.Assertions.assertAll;

class TodoMvcParameterizedTests extends PlaywrightTest {

    TodoMvcPage todoMvc;

    @BeforeEach
    void navigateTo() {
        todoMvc = new TodoMvcPage(page);
        todoMvc.navigateTo();
    }

    @ParameterizedTest
    @CsvFileSource(resources = "/todos.csv", numLinesToSkip = 1, delimiter = ';')
    @DisplayName("Creates Todo with given name")
    void createsTodo(String todo) {
        todoMvc.createTodo(todo);
        assertSingleTodoShown(todo);
    }

    @ParameterizedTest(name = "{index} - {0}, done = {1}")
    @CsvFileSource(resources = "/todos.csv", numLinesToSkip = 1, delimiter = ';')
    @DisplayName("Creates and optionally removes Todo with given name")
    void createsAndRemovesTodo(String todo, boolean done) {

        todoMvc.createTodo(todo);
        assertSingleTodoShown(todo);

        todoMvc.showActive();
        assertSingleTodoShown(todo);

        if (done) {
            todoMvc.completeTodo(todo);
            assertNoTodoShown(todo);

            todoMvc.showCompleted();
            assertSingleTodoShown(todo);
        }

        todoMvc.removeTodo(todo);
        assertNoTodoShown(todo);
    }

    private void assertSingleTodoShown(String todo) {
        assertAll(
                () -> assertThat(todoMvc.getTodoCount()).isOne(),
                () -> assertThat(todoMvc.todoExists(todo)).isTrue()
        );
    }

    private void assertNoTodoShown(String todo) {
        assertAll(
                () -> assertThat(todoMvc.getTodoCount()).isZero(),
                () -> assertThat(todoMvc.todoExists(todo)).isFalse()
        );
    }
}
Run the parameterized tests
To run the tests, execute the following command:
./gradlew test --tests TodoMvcParameterizedTests

TodoMvcParameterizedTests > Creates and optionally removes Todo with given name > pl.codeleak.demos.playwright.TodoMvcParameterizedTests.createsAndRemovesTodo(String, boolean)[1] PASSED

TodoMvcParameterizedTests > Creates and optionally removes Todo with given name > pl.codeleak.demos.playwright.TodoMvcParameterizedTests.createsAndRemovesTodo(String, boolean)[2] PASSED

TodoMvcParameterizedTests > Creates and optionally removes Todo with given name > pl.codeleak.demos.playwright.TodoMvcParameterizedTests.createsAndRemovesTodo(String, boolean)[3] PASSED

TodoMvcParameterizedTests > Creates Todo with given name > pl.codeleak.demos.playwright.TodoMvcParameterizedTests.createsTodo(String)[1] PASSED

TodoMvcParameterizedTests > Creates Todo with given name > pl.codeleak.demos.playwright.TodoMvcParameterizedTests.createsTodo(String)[2] PASSED

TodoMvcParameterizedTests > Creates Todo with given name > pl.codeleak.demos.playwright.TodoMvcParameterizedTests.createsTodo(String)[3] PASSED

BUILD SUCCESSFUL in 8s
Read also: Cleaner Parameterized Tests with JUnit 5
Run all the tests
Up to now, we have quite some tests. Let's run all them and see how long it takes:
./gradlew clean test

BUILD SUCCESSFUL in 17s
Pretty long. Can we speed it up?
Parallel tests execution
JUnit 5 has built-in support for parallel tests execution but by default tests are executed sequentially. To change this, we need to provide several properties, but we also need to make sure that our Playwright based tests can be executed in parallel.
Playwright and thread-safety
Playwright for Java is not thread-safe, meaning that its methods, as well as the methods of objects created by it (such as BrowserContext, Browser, Page, etc.), should only be accessed on the thread where the Playwright object was created, or proper synchronization must be put in place to ensure that only one thread is accessing Playwright methods at a time.
Given that using the same Playwright objects across multiple threads without proper synchronization is not safe, it is recommended to create a separate Playwright instance for each thread and use it exclusively on that thread.
As you may recall, our PlaywrightTest base class is annotated with @TestInstance(TestInstance.Lifecycle.PER_CLASS) to make sure that the Playwright instance is created only once for the lifecycle of that class. This little trick does the job. At least, part of it. We still need to configure JUnit to run tests in parallel.
JUnit 5 configuration for parallel execution
To enable parallel execution, we need to set several properties. We can provide the properties on the command line or via junit-platform.prperties file.
For that, create junit-platform.properties file in the src/test/resources directory and add the following properties to it:
junit.jupiter.execution.parallel.enabled=true
junit.jupiter.execution.parallel.mode.classes.default=concurrent
junit.jupiter.execution.parallel.config.dynamic.factor=0.5
What it does, is that it enables parallel execution of separate test classes (test methods in each class are executed sequentially) and dynamically uses up to 50% of the available CPU cores.
Let's see if it works:
./gradlew clean test

5 actionable tasks: 5 executed
❯ ./gradlew clean test
<===========--> 87% EXECUTING [5s]
> :test > 0 tests completed
> :test > Executing test pl.codeleak.demos.playwright.TodoMvcParameterizedTests
> :test > Executing test pl.codeleak.demos.playwright.BlogSearchTest
> :test > Executing test pl.codeleak.demos.playwright.TodoMvcTests


BUILD SUCCESSFUL in 11s
It works! The tests are executed in parallel, and it took only 11 seconds to run all of them. You might have noticed that all 3 classes were executed in parallel.
Read more about parallel execution of tests in JUnit 5 User Guide
Basic GitHub Actions workflow
Setting up a basic GitHub Actions workflow is pretty straightforward. One important part to remember is that Playwright download all the browsers on each run (~300 MB) so it would be a good idea to use cache. This may slightly improve the performance of the subsequent workflow runs. Gradle build action supports caching its dependencies by default, but with Playwright we need to do it manually.
Let's create a new workflow file called run-tests.yml in the .github/workflows directory:
name: Playwright Tests

on:
  workflow_dispatch:
  push:
    branches:
      main

jobs:
  build:
    runs-on: ubuntu-latest

    steps:
      - name: Checkout
        uses: actions/checkout@v3

      - name: Set up JDK 17
        uses: actions/setup-java@v3
        with:
          java-version: '17'
          distribution: 'temurin'

      - name: Validate Gradle wrapper
        uses: gradle/wrapper-validation-action@v1

      - name: Setup Gradle
        uses: gradle/gradle-build-action@v2

      - name: Playwright cache
        uses: actions/cache@v3
        with:
          path: |
            ~/.cache/ms-playwright
          key: ms-playwright-${{ hashFiles('**/build.gradle') }}

      - name: Run tests
        run: ./gradlew clean test
This workflow will run on every push to the main branch and on demand (workflow_dispatch). It will checkout the code, setup JDK 17, validate Gradlewrapper, setupGradleand cachePlaywright's ms-playwright` directly. Finally, it will run all the tests.
👉 No-cache run:

👉 With-cache run:
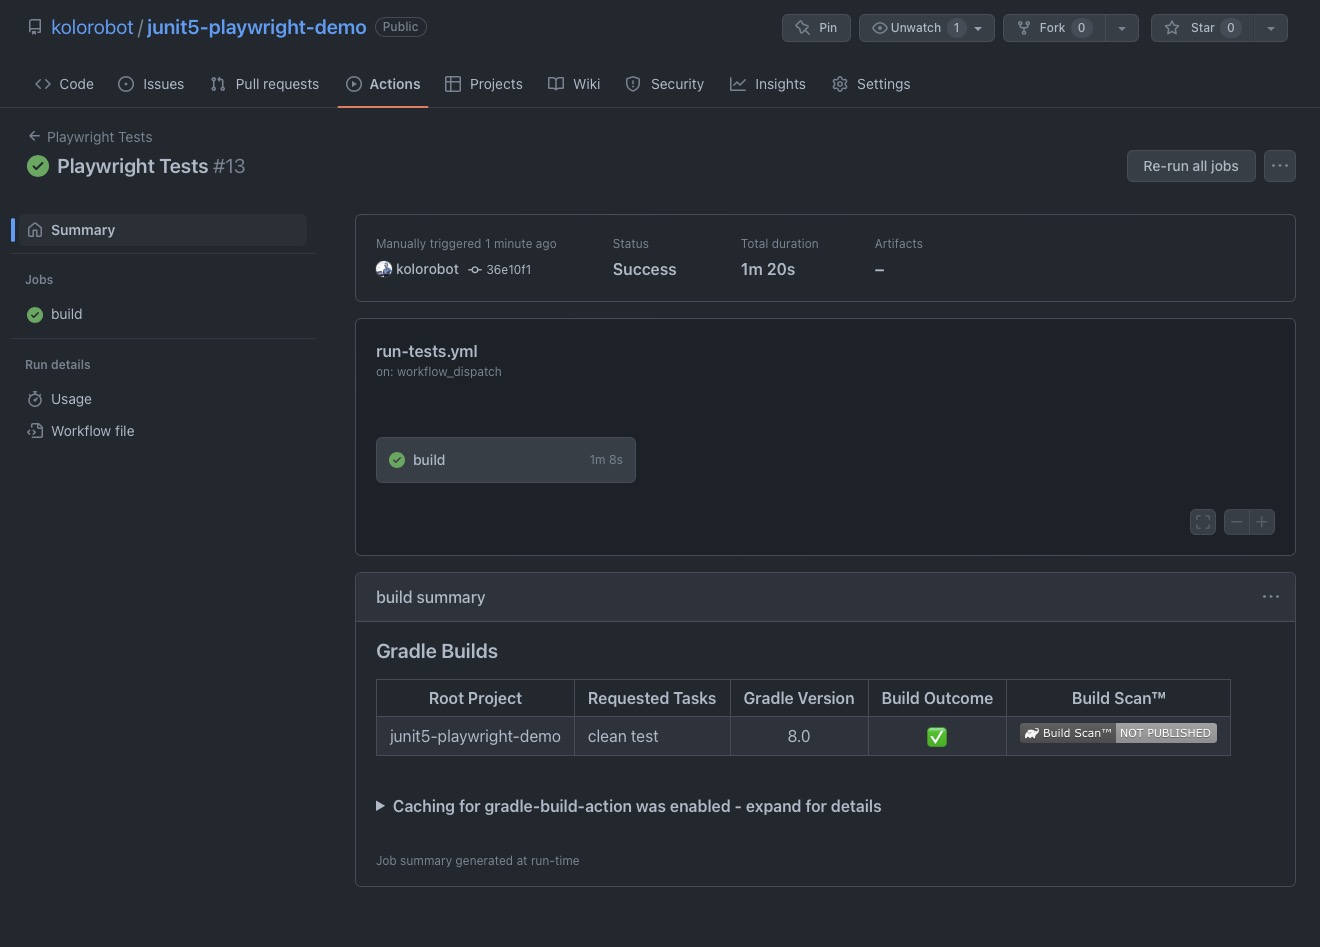
You may further analyze the results in the Actions tab of your repository.
Please note, this is really simple setup, and it does not cover all the possible scenarios. For example, it does not run tests on multiple browsers as the project itself is not prepared for that.
Playwright for Java and Docker
Official Docker image can be found here. It contains all the necessary dependencies to run Playwright for Java tests which are Java, Maven and the browsers. No Gradle is pre-installed, but since we are using Gradle Wrapper, we don't actually need it.
Running tests in Docker
Let's get started with pulling the image and running tests manually. In order to that, run the following commands inside the project directory:
docker pull mcr.microsoft.com/playwright/java:v1.30.0-focal
docker run -it --rm --ipc=host -v $PWD:/tests mcr.microsoft.com/playwright/java:v1.30.0-focal /bin/bash
The above commands will pull the image and run a container with the image. The container will be removed after it exits. The --ipc=host flag is used to share the host's IPC namespace with the container, and it is recommended for Playwright to work properly. The -v $PWD:/tests flag is used to mount the current directory as a volume inside the container. The volume is mounted to the /tests directory inside the container.
Once the container is running, we can run the tests:
root@0644b3386f94:/# cd tests/
root@0644b3386f94:/tests# ./gradlew clean test
Downloading https://services.gradle.org/distributions/gradle-8.0-bin.zip

Welcome to Gradle 8.0!

Starting a Gradle Daemon (subsequent builds will be faster)
Invalid Java installation found at '/usr/lib/jvm/openjdk-17' (Common Linux Locations). It will be re-checked in the next build. This might have performance impact if it keeps failing. Run the 'javaToolchains' task for more details.

> Task :test

<===========--> 87% EXECUTING [13s]
> :test > 11 tests completed
> :test > Executing test pl.codeleak.demos.playwright.TodoMvcParameterizedTests
> :test > Executing test pl.codeleak.demos.playwright.TodoMvcTests


BUILD SUCCESSFUL in 51s
5 actionable tasks: 5 executed
Note: As it goes to Invalid Java installation found error, there seem to be solution in the next version of Gradle: https://github.com/gradle/gradle/pull/23643
Creating a Dockerfile
So, we confirmed the image can be used to run the tests, but we still need to create a Dockerfile to build our own image. Let's create a Dockerfile in the project directory:
# Extend official Playwright for Java image
FROM mcr.microsoft.com/playwright/java:v1.30.0-focal

# Set the work directory for the application
WORKDIR /tests

# Copy the needed files to the app folder in Docker image
COPY gradle /tests/gradle
COPY src /tests/src
COPY build.gradle /tests
COPY gradle.properties /tests
COPY gradlew /tests
COPY settings.gradle /tests

# Install dependencies to speed up subsequent test runs
RUN ./gradlew --version
This Dockerfile extends the official Playwright for Java image and sets the working directory for the tests. It copies the necessary files to the app and installs the dependencies to speed up subsequent test runs.
Now, we can build the image:
docker build -t playwright-java-tests .
And run tests in the container:
docker run -it --rm --ipc=host playwright-java-tests ./gradlew clean test
Conclusion
I believe that Playwright for Java is a modern and developer-friendly alternative to Selenium and Selenium-based tools and frameworks for end-to-end testing in Java-based projects. However, using Playwright for Java may require some compromises and extra work for proper configuration. It's important to note that the Node.js version of Playwright is powerful enough to handle complex end-to-end testing.
Although I currently consider the Node.js version of Playwright to be superior, I still believe that the Playwright for Java option is worth considering for a few reasons. Firstly, for teams that are unable to use Node.js, Playwright for Java provides a viable alternative for end-to-end testing. Secondly, it can also be used for automating tasks such as crawling web pages and scraping data or even Robotic Process Automation (RPA) and not just for creating end-to-end tests.
If you have any suggestions or improvements, please feel free to contact me via Twitter, LinkedIn, or report an issue in the project repository.